Getting Started on the Hub

Registering with the Hub
Registering on the Local Contexts Hub can be done by clicking the Login button at the top of the page. You will register using an email address and create a username and password.
*Please make sure to read and agree to the Terms and Conditions, Privacy Policy, and Indigenous Data Sovereignty Agreement before continuing.*
The next step is to verify your email address. Click on the link in the email from no-reply@localcontextshub.org to log in to your newly created Local Contexts Hub profile. Check your spam or junk folder if you cannot find the email in your primary inbox.
Create and Edit Your Profile
Your Hub profile can help other people on the Hub get to know you when you decide to join an account or collaborate on a project on the Local Contexts Hub.
How to create a profile
Once your email is verified, you can create your personal profile. You can share basic information, including:
- Your first and last name
- Your job title or community role
- Any languages spoken
- Any affiliations you have
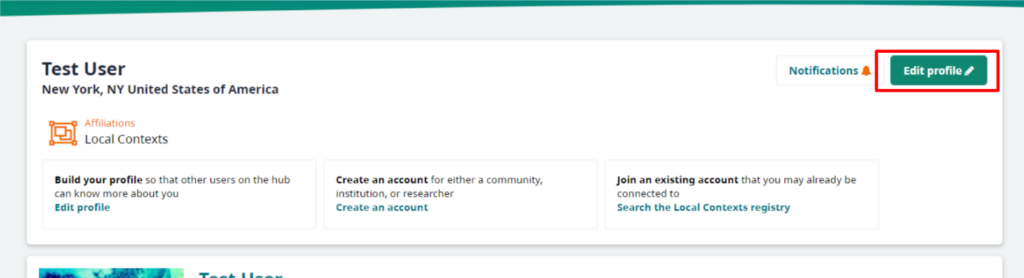
To edit or update this information, click on the “Edit Profile” button on your dashboard. In your profile settings, you can also join, create, or leave an account, change your password, and deactivate your account. This information can be edited anytime, just make sure to click the “Save” button.
Create an Account
What is the purpose of an account?
Accounts are workspaces created specifically for an entity. An account enables the development, collaboration, and management of Local Contexts Labels, Notices, and Projects. You should join or create accounts for communities and institutions that you are already affiliated with. You can be a member of multiple accounts and account types.
There are three account types:
- A community account is for Indigenous community entities or representatives. Community entities could include Tribes, Bands, Iwi, Nations, Land Councils, Tribal Historic Preservation Officers, Cultural Departments, Community Centers, Preservation Offices, and Community Archives and Museums. Community accounts customize and apply Traditional Knowledge and Biocultural Labels on behalf of their community.
- An institution account is for cultural and research institutions and data repositories. This includes archives, libraries, museums, historical societies, galleries, data repositories, universities, and other organizations. Institution accounts generate Notices.
- A researcher account is for an individual who carries out academic or scientific research independently or in an institution. Researcher accounts generate Notices.
You can create or join an account after your profile has been created.
How to join an account
Before creating a community or institution account, check to see if this account has already been created in the Hub. There are two ways you can search for and join an account:
Option 1: Joining an account when registering
To find out if your community or institution has an account when registering, click the ‘Join’ button underneath the account type of your choice. This will lead you to a page that enables you to browse the accounts currently registered on the Hub.
To request to join an account, select the account and follow the prompts. If you request to join an account, information from your profile will be sent to the account to identify who you are.
Option 2: Joining an account through the registry
The Local Contexts Registry is a list of all the accounts participating in the Local Contexts Hub. This is available anytime from the navigation bar at the top of the Local Contexts Hub.
Registered users of the Hub can contact and/or request to join other accounts on each account’s public page. If you request to join an account, information from your profile will be sent to the account to identify who you are.
How to create an account
You can create a community, institution, or researcher account during registration or from your profile dashboard.
Community Account
Community Account
To create a Community account, we ask for:
- The name of your community
- The name of your community entity, such as the Tribal Council, THPO, Community Center, or Tribal Museum
- The location of your community – you may list multiple locations or a general area
- A community description (less than 200 characters) that introduces your community or entity
- Contact information or a letter of support from a community representative (see confirmation step below)
This information will be shared on the Local Contexts Registry, where registered users can request to join accounts or contact them directly.
Institution Account
Institution Account
To create an Institution account, we ask for:
- Your country and institution type to find your organization in the ROR database
- If you are not certain of your institution type, you can try searching the ROR database. If your organization is not in the ROR database, fill out the form linked in registration.
- A brief description (less than 200 characters) of your institution
- Contact information or a letter of support from an institutional representative (see confirmation step below)
This information will be shared on the Local Contexts Registry, where registered users can request to join accounts or contact them directly.
Researcher Account
Researcher Account
To create a Researcher account, we encourage you to connect your Open Researcher and Contributor ID (ORCID) account.
An ORCID iD is a persistent digital identifier that you own and control that distinguishes you from other researchers. By connecting your ORCID to the Local Contexts Hub, your ORCID iD will be associated with Profile. If you do not have an ORCID iD, you can create one on their website.
We also ask for your primary institution and a researcher description, where you can share your research interests and expertise. This information will be shared on the Local Contexts Registry.
What is a confirmation step?
The confirmation step helps to ensure the accounts that are being created in the Local Contexts Hub have permission to be active on the platform (researchers do not need to complete this step).
In order for a community or institution account to be fully activated on the Hub, we ask for confirmation from a community or institution representative. This representative should be someone who has responsibility for authorizing community initiatives, or third-party and/or external agreements.
There are two options to complete this part of the registration process:
Option 1
Provide contact details (name and email address) of the representative. In order for the account to be fully activated on the Hub, the representative will need to respond to an email within 90 days to confirm that the account being created has the necessary approval from the community or institution.
Option 2
Upload a written letter from the representative outlining their approval and awareness of this account being created on the Local Contexts Hub. This letter can be PDF, JPG, or PNG. Template letters and introductory overviews are available in the Hub or on the downloadable resources page.
What is a community boundary?
In working towards our goal of supporting a mapping option to connect communities with their belongings and data, the first stage of this feature has been added to community accounts.
Enhance your community’s visibility on the Hub by adding your community boundaries. In future development of the Hub, this information will help to connect you with your collections and data held outside your community.
We are using the term “community boundary” to represent the spatial areas which the community has relationships with and/or responsibilities for. This could represent legal territorial boundaries or traditional areas of interest — areas where you would be interested in Projects.
We acknowledge that the interests of different communities may overlap and at times the representation of community boundaries may be a source of tension.
There are currently two options for adding a community boundary:
Option 1: Search the Native Land Digital database
Native Land Digital is an Indigenous-led mapping tool that maps Indigenous territories, treaties, and languages around the world. Search the Native Land Digital database by address, town, or community name to select your community’s boundary. After making a selection, view the location on Native Land Digital’s website to confirm the selected boundary is appropriate. If your boundary is not appropriate, please contact Native Land Digital.
Option 2: Upload a shapefile
Add your community boundary by uploading a shapefile. A shapefile is a vector data file format commonly used for geospatial analysis. You can create shapefiles on third-party websites like ArcGIS and QGIS.
A community boundary can be added when you are registering your community account, or in your community account settings. The boundary can be edited or removed in your community account settings.
We are interested in your feedback about this new feature.
What are Connections?
The Connections tab lists each of the accounts you have connected with through Projects on the Local Contexts Hub and their contact details. This tab is a way to access Projects organized by collaborators’ accounts.
Add and Manage Members
What is an account member?
Members are the people who are a part of an institution or community account. There is no limit on how many people can be a part of one account. Each person has a role that will allow them to do certain activities in the Local Contexts Hub.
The Local Contexts Hub offers three different responsibilities within each account:
- Administrator: An administrator is responsible for managing members and communicating with external interests. Administrators can create and contribute to Projects, and in a Community account can also customize and approve Labels.
- Editor(s): Editors can create and contribute to Projects. Editors in community accounts can also customize and approve Labels.
- Viewer(s): Viewers can view the activity happening in the account but cannot change or edit anything.
How to add a member to your account
Administrators and Editors have the option to invite people to join the account, or by accepting requests to join.
Option 1: Adding new members from the Members section
Administrators can add new members within the ‘Member’ section of the account dashboard. After clicking the ‘add a new member’ button, you can search for people already registered in the Hub, or send an invitation by email to those who are not. You can assign a role and add a message, which will be included in the invitation.
Option 2: Adding new members from member requests
If you are registered on the Local Contexts Hub, you can ‘request to join’ your account through the Local Contexts Registry or during the registration process.
When someone requests to join an account, account administrators will receive an email and notification in the Hub with the requested role and a message. Administrators can accept or decline the request when viewing “Member Requests” in the Members section.
How to manage members
Administrators have the responsibility to accept new members, change member responsibilities, and remove members from an account.
These actions can be done within the Members section of the account dashboard. Each member of the account will be listed here, where administrators can change their role or remove them from the account.
Create a Project
What is a Local Contexts Project?
Local Contexts Projects describe the context where Labels or Notices are being applied. For example, a project could include: a website, university syllabus, dissertation, research publication, dataset, museum exhibition, archival record, item in a collection, library database, photography collection, voucher specimen, and/or metadata about a record.
When you create a Local Contexts Project, you will be asked for project details and contacts, and have the option to add metadata.
Creating Projects allows institutions and researchers to generate Notices and engage, acknowledge, and make visible Indigenous interests in collections, information, and data. Communities may then choose how and when to add their Labels.
Community accounts can apply customized Labels to Local Contexts Projects they create in the Local Contexts Hub and Local Contexts Projects they have been sent by Institution and researcher accounts.
How to create a Project
Local Contexts Projects are created within the Projects section of your account. To create a Local Contexts Project, you will be asked for project details and contacts, and have the option to add metadata.
Institutions and researchers should remember that the audience for the project is the communities that they wish to engage with and who have rights, responsibilities, and interests in the material, information, and data. This project information can be sent to communities as a notification after creating the project.
Project Notice (Institutions and Researchers Only)
Select which Local Contexts Notice(s) apply to this Project. You must select at least one Notice, and can select multiple Notices by clicking the checkbox under each Notice.
Project Information
This section summarizes key information about the project.
First, from the dropdown menu, select your project type:
- Item (a single record, photograph, sound recording, manuscript, archival document, digital heritage item, artwork)
- Collection (papers, language materials, DNA sequences, voucher specimens, researcher collection)
- Samples ((biological, genetic, datasets)
- Expedition (collecting event, research trip)
- Publication (digital publication, website, research publication, archival publication)
- Exhibition (online or on-site)
- Other (something else, such as a university syllabus or metadata)
Next, enter a project title and description. The title should be a couple of words identifying the project and making it accessible to others. Your description should be a brief overview of the project. You do not need to detail all information or include data within the Hub Project.
Lastly, you can add external links where viewers can find more information about the project, or where Notices/Labels may be added. This external link might be for your catalog, collection website, database, or object record.
Project Contacts
Next, you will identify who is involved with this project.
A project contact name and email are required. This contact should be the primary person responsible for discussing the project. Their information will be visible to contributors and on a public project.
Next, you can add project contributors. You can search for accounts already on the Hub, or add individuals by email. Add multiple contributors with the green + button. There is no limit on how many people can be added to a project.
Optional project information
This is an optional step to include certain permanent identifiers already associated with this project:
- Provider’s Project ID: An external Project ID, like a catalog or accession number (or alternate project ID), that is already being used in a different system from the Local Contexts Hub.
- Project Data GUID: A Globally Unique Identifier, such as an ARK identifier
- Project DOI: A persistent, unique identifier commonly assigned to digital publications, such as ebooks and journal articles.
Visibility
The purpose of this section is to determine who can view the project.
- Public: All project details can be viewed at the project link and through your public page in the registry.
- Contributors and notified communities will be able to interact with the project. Limited project details (title, unique ID, attached Notices, or Labels) can be accessed through the Hub API.
- Contributor view: Anyone with the link can view the project unique identifier and any Labels or Notices attached.
- Contributors and notified communities will be able to interact with the project. Limited project details (title, unique ID) can be accessed through the Hub API.
- Private: Only the project creator can see the project information.
- If contributors are added, communities are notified, or Labels are applied, then the private project will be changed to discoverable. Private projects cannot be accessed with the Hub API.
Finally, press the “Save Project” button. You can edit the project information until Labels have been applied.
Edit and Manage a Project
How to edit a Project
Once you have created a project, you can edit it at any time. To do this, go to the Project view page and click “Edit Project”.
All contributors and notified communities for this Project will receive a notification that the project has been edited.
Notify Communities (Institutions/Researchers Only)
After creating a project, Institution and Researcher accounts can notify community accounts.
By notifying relevant communities, they are able to see what this Project is and decide whether or not they would like to add their Labels to this Project. After your organization has entered the communities you would like to send these requests to, you can monitor and communicate with them in the requests section.
Institutions and researchers can notify communities by clicking on the project title and then “Notify Communities.” In the window, search through registered Hub communities and select the ones you wish to notify.
Once the desired accounts are selected, you can write a message introducing yourself and the project. Note that if you are notifying multiple communities, the same message will be sent to all of the communities. If you would like to send different messages, you must notify the communities one at a time.
You will be notified if a community updates the project status, sends a message, or applies Labels.
Responding to Projects (Communities Only)
Institution and Researcher accounts may notify community accounts about projects. When you are notified about a project, you will be able to view project details, update the project status, send a message, and decide to apply Labels.
Update the project status using the dropdown menu to define your community’s decision on whether or not you would like to collaborate on this project. The status options are:
- Acknowledge Notice: You have seen the Project but have not made a decision about applying Labels
- Labels Pending: You are deciding which Label(s) to apply to the Project
- No Labels Pending: You will not apply Labels to the Project
- Labels Applied: This will automatically be your status if you have applied Labels to the Project
You can use the project messages to ask a question or provide a more detailed update.
Applying Labels to Projects (Communities Only)
Communities decide if and when they would like to apply a Label or Labels to a project. Labels can be applied to projects you have created as a community or projects that have been shared with you from institutions or researchers. You can change which Labels are applied to a project at any time.
Labels can be applied when viewing the detailed Project page. Click the “Apply Labels” button and then select which Label(s) you would like to apply to the project. When you select a Label’s checkbox, its description will appear below your Labels.
You can only apply Labels that have been customized and approved. For more information about this process, see “Working with the Labels”.
You can include a Community Note to document internal community information about how the Labels are being used on this Project and why. This will only be visible to members of your community.
When you have selected the Label(s) you would like to apply, click the “Apply Labels to Project” button. The Labels will then appear on the project and can be downloaded alongside the project information.
If you are applying Labels to a project from an institution or researcher, the TK, BC, and Attribution Incomplete Notices will be replaced by the Labels you have applied. The project contributors will also be notified that Labels have been placed on the project.
You can change which Labels have been applied to a project at any time. To do this, click the “Apply Labels” button and select or deselect which Labels you would like applied.
Accessing Project Information for Display Outside of the Hub
Project information can either be downloaded or accessed with the Hub API.
Download
A project can be downloaded on the detailed project page. The download will reflect the current project. The downloaded zip file will include:
- Readme text file describing the folder contents
- Project overview PDF
- Usage Guide PDF for either the Labels or Notices, depending on which are currently applied
- PNG and SVG files of the Notice or Label icons
- Text file(s) with the Notice or Label text
Hub API
The Local Contexts Hub API’s purpose is to fetch the details, Labels, and/or Notices associated with a particular Local Contexts Hub Project via a GET request. GET is used to retrieve and request data from a specified resource in a server.
When you create a Project in the Local Contexts Hub, it will automatically be assigned a randomly generated 36 alphanumeric unique identifier to the unique_id field in the following format: 8-4-4-4-12, where each of the numbers represents the number of randomized alphanumerics (hyphens are constant) with all letters always being lowercase. Here are some examples of what this ID would look like:
- 2303177e-ff5c-11eb-9a03-0242ac130003
- acef9b22-5a8d-4536-a624-fe3f68d140d4
- d03cce00-9e36-4ad1-98bc-1abaf1e0e983
Using the project’s unique ID, you will be able to use the Hub API to fetch project details. For more details about the Hub API, see the API Implementation Guide or the API documentation.
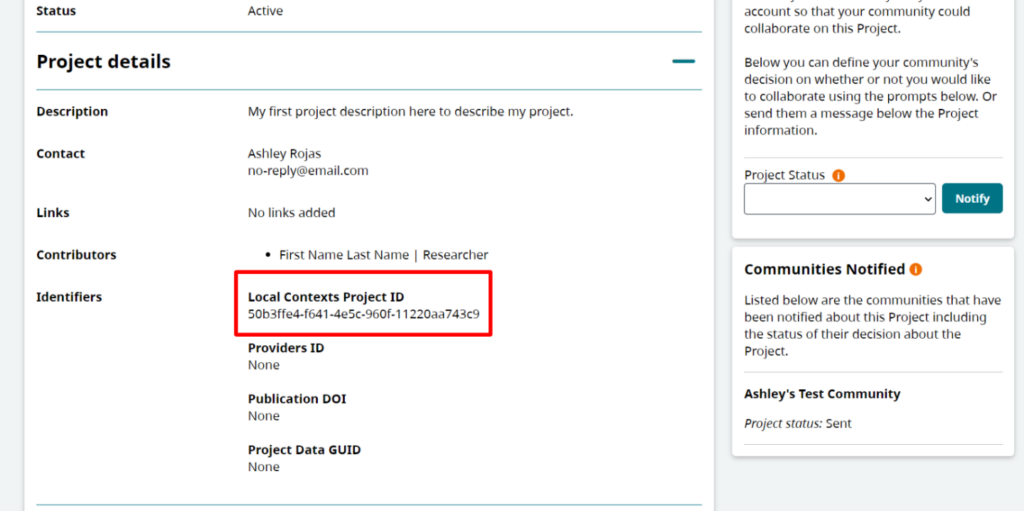
How to find a Project ID
On the Project View page, scroll down to the “Identifiers” section to see the Local Contexts Project ID.
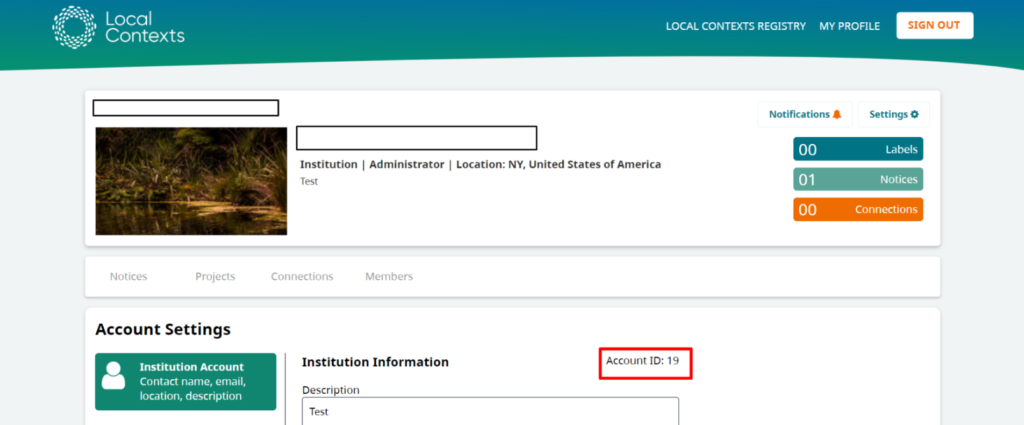
How to find an Account or User ID
To find an account ID, an administrator of an account should:
1. Log in to the Hub and go into the account.
2. Click on “Settings” in the top right corner.
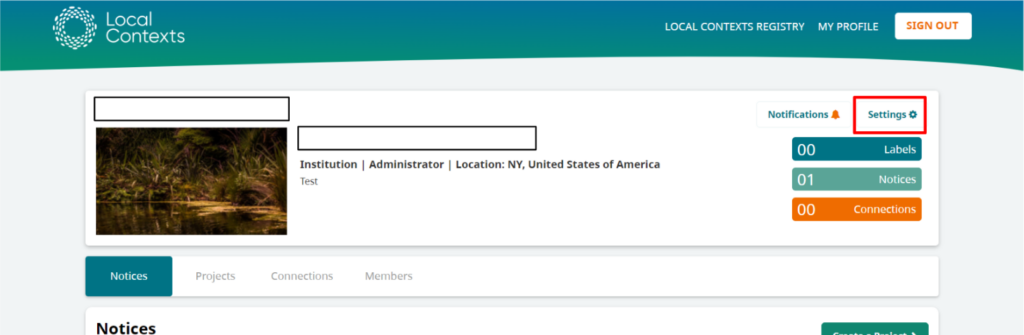
3. In the Account Information section, you will see your ID number in the top right corner.
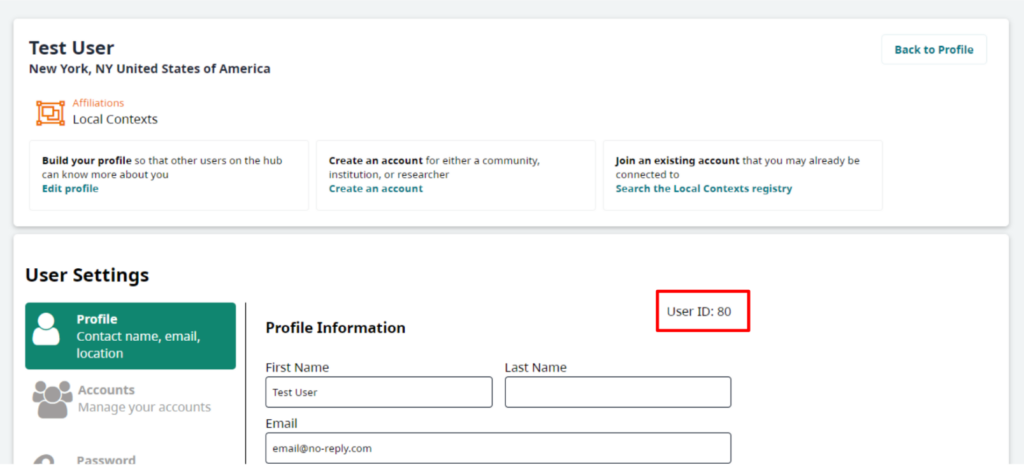
To find your user ID,
1. Log in to the Hub.
2. Click on the “Edit Profile” button to the right of your name.
3. In the Profile Information section, you will see your ID number in the top right corner.